

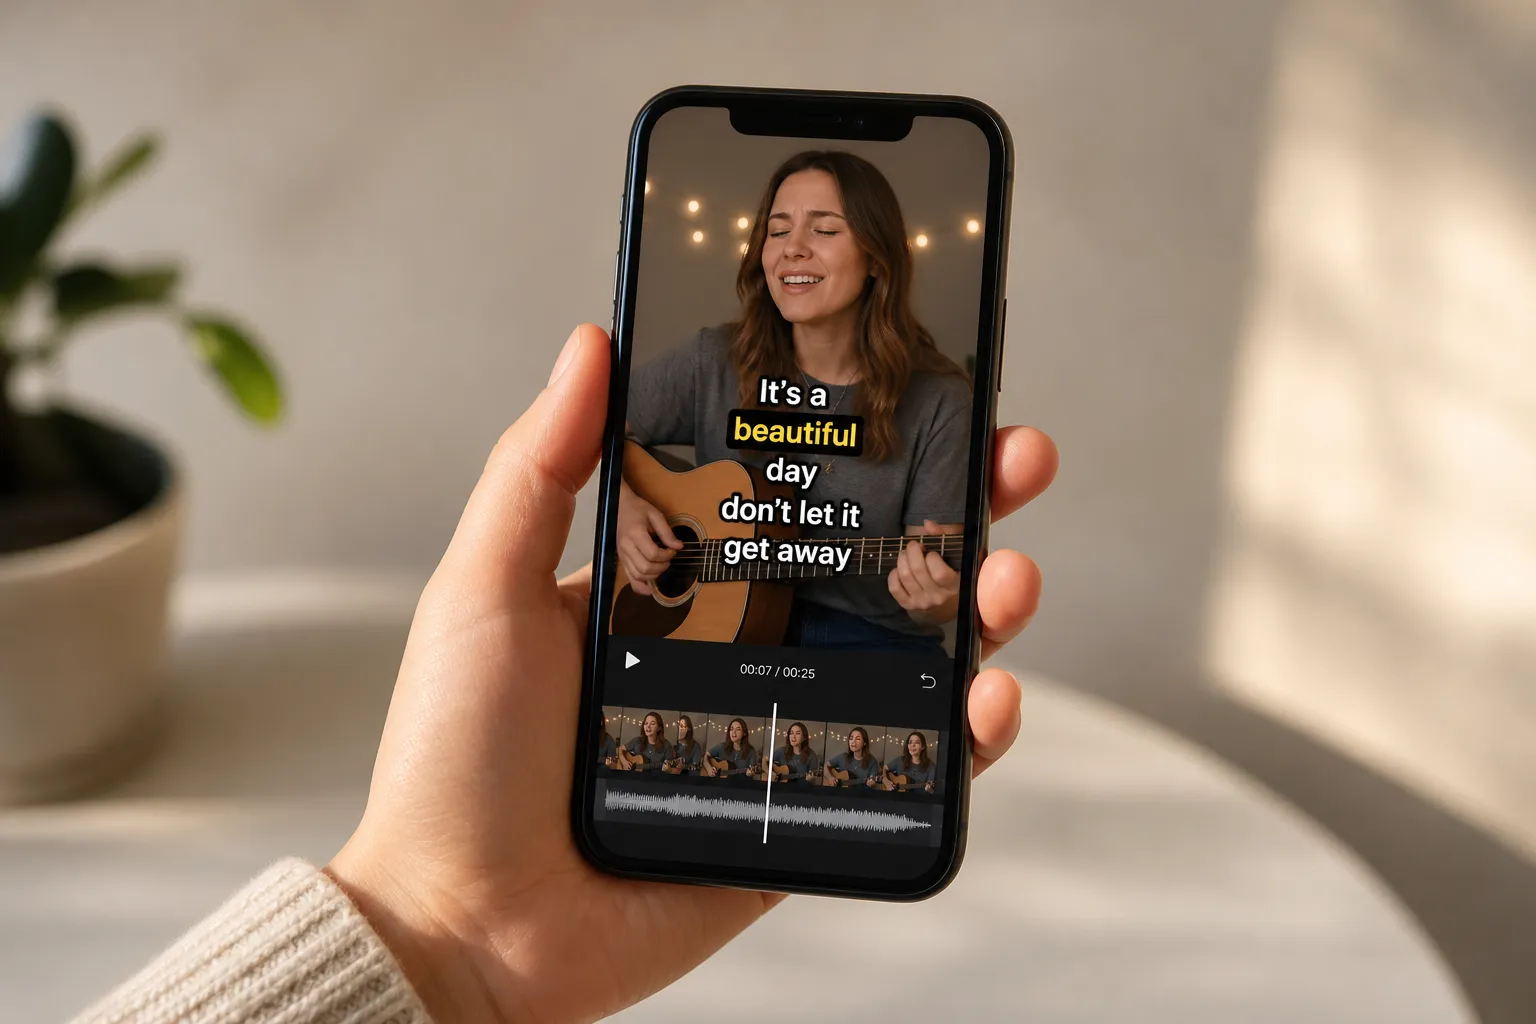
Most social views happen with the sound off, which puts your message at risk. Platform-added captions can get restyled, hidden by UI, or lost on re-uploads. If you want captions to look the same everywhere and play reliably, burn in subtitles online before you post.
Below is a practical, platform-ready workflow using SubtitlesFast that keeps text readable on small screens, fits the right aspect ratio, and exports fast for TikTok, YouTube, Instagram, and X.
Why choose burned-in captions
Burned-in captions are part of the video frame. They survive re-uploads, file conversions, screen recordings, and reposts. The text looks the same whether someone watches on TikTok, YouTube Shorts, Instagram Reels, or a Twitter repost.
You also keep full control of the look. Instead of hoping each app renders your style correctly, you choose fonts, colors, outlines, and animations with Subtitle Style Customization. If you want word-by-word highlights, Karaoke Style Subtitles and Karaoke Style Captions add a clean bounce that keeps attention without extra keyframing. SubtitlesFast also works as an AI subtitles generator, so you can add subtitles to video online without juggling SRTs.
Burned-in is a good fit for muted autoplay. For example, short promo clips shared from a local directory like SitterListed will auto-play in feeds, and captions that are already on the frame make sure the message lands without sound.
One trade-off to know: burned-in captions cannot be toggled off by the viewer. If you also want a switchable track for accessibility, keep a separate caption file for platforms that support it and post that alongside your burned-in master.
Style and position for small screens
Design for a phone first. Your viewer might be glancing between stops or skimming in a line. Keep captions bold, short, and out of the way of app chrome.
- Keep 1 - 2 lines per subtitle. Aim for roughly 32 - 42 characters per line. Break lines at natural pauses and keep phrases together.
- Use high contrast. Light text on a dark box or dark text on a light box works best against busy footage. A 2 - 4 px outline or a semi-opaque background at 60 - 80% keeps edges clean.
- Pick a size that reads at arm’s length. At 1080 × 1920, start around 54 - 72 px for body captions, line height 120 - 140%, and 8 - 16 px of padding inside the box.
- Place captions above app UI. Keep text above the bottom 12 - 15% of the frame and below the top 10% to avoid usernames, buttons, and progress bars. After export, do a quick check in each app preview.
- Make keywords pop with motion used sparingly. With Karaoke Style Subtitles, set a subtle color change or underline on spoken words. Avoid heavy bounce or blur that smears on small screens.
Aspect ratios by platform are simple: 9:16 for TikTok, Reels, and Shorts, 16:9 for YouTube landscape, and 1:1 for square feeds. Use Change Aspect Ratio to swap layouts, then nudge caption position for each frame so it clears UI in every version.
Burn in subtitles online in 5 steps
-
Upload your clip and auto-transcribe. Open SubtitlesFast and add your video. Use AI Subtitles to generate text in 50+ languages with word-level timing. Correct names, numbers, and brand terms in the editor. Keep reading speed comfortable by setting 1.5 - 3.5 seconds per card for most lines and leaving a 2 - 6 frame lead-in before speech.
-
Style your captions for readability. In Subtitle Style Customization, pick a base style, then dial in font, weight, size, color, outline, and background. For fast dialogue or punchy hooks, turn on Karaoke Style Subtitles to highlight each word on sync. Use a bold or semibold weight, strong contrast, and keep lines short. Test against a bright and a dark frame to make sure both read.
-
Fit the platform frame. Use Change Aspect Ratio to switch layouts. Choose 9:16 for vertical, 16:9 for landscape, or 1:1 for square. After switching, adjust safe areas: keep captions just above the bottom UI in vertical, inside TV-safe margins in landscape, and centered in square. If you have a lower-third name tag, raise captions so both elements stay clear.
-
Tighten the cut and add finishing touches. Use Timeline Editing to trim and rearrange clips so the first two seconds hook. Cut dead air and long pauses. Add Music from the library or your licensed track and balance it under dialogue. If you post multiple languages, use Translate Subtitles to create versions without re-editing timing. For your grid, use the AI Thumbnail Generator to grab a frame that matches your caption style.
-
Export with burned-in subtitles. Choose Burned-In Subtitles to render the final video with captions embedded. Export one clean master per aspect ratio instead of re-encoding downloaded platform copies. Post that master anywhere and your text will match across reshares.
Export for crisp, readable text
Clean design is half the job. The render is the other half. Match your export to the source quality when you can, then keep these guardrails:
- Resolution. For vertical, 1080 × 1920 is standard. If your source is higher, 2160 × 3840 will keep edges extra clean, but only if your footage supports it.
- Codec and profile. H.264 High Profile works well for most platforms. If you need smaller files, H.265 can help, but check upload support.
- Bitrate. For 1080p, 10 - 16 Mbps keeps type crisp. For 4K, 35 - 45 Mbps. Use VBR 2-pass when available. Set keyframes every 1 - 2 seconds so fast cuts stay sharp.
- Color and sharpening. Avoid heavy noise reduction or over-sharpening, which can halo text. Keep background grain mild so outlines do not crawl.
- One render, not three. Do not stack exports. Render once from your master instead of downloading a compressed social file and re-uploading it.
Do a quick phone check at 1x playback before you publish. Look for thin letters that shimmer, colors that blend into the background, or captions hidden by UI. If anything looks off, tweak size, contrast, or position and re-export. Five minutes here prevents “can’t read the text” comments later.
Key takeaways
- Burned-in captions keep your style consistent across TikTok, YouTube, Instagram, and X and survive reposts and screen recordings.
- Use AI Subtitles for fast, accurate text and Karaoke Style Captions for word-level highlights that hold attention.
- Design for phones: short lines, bold fonts, strong contrast, and captions placed above app UI.
- Use Change Aspect Ratio for 9:16, 16:9, or 1:1, then nudge caption position per layout.
- Export a clean master with enough bitrate and avoid re-encoding to keep text crisp.
If you want a fast, all-in-one path to add subtitles to video online, SubtitlesFast covers AI Subtitles, Translation, animated styling, timeline trims, aspect ratio swaps, and one-click Burned-In Subtitles so your captions look right everywhere.
FAQ
What is the difference between burned-in subtitles and closed captions?
Burned-in subtitles are baked into the video pixels and cannot be turned off. Closed captions are separate text tracks that platforms may style or hide.
Will burned-in captions hurt my reach on TikTok or YouTube?
No. Burned-in captions are part of the video, so they upload like any other clip. Many creators see better retention because viewers can follow along on mute.
How do I make karaoke style captions that highlight each word?
Use Karaoke Style Subtitles or Karaoke Style Captions in SubtitlesFast. The timing follows the spoken audio, highlighting each word as it is said.
Can I translate my subtitles for other audiences?
Yes. Use Translate Subtitles to create versions in other languages without rebuilding your edit.
Do I need to upload an SRT file to add captions?
No. With AI Subtitles you can auto-transcribe in the editor, then style and export with burned-in subtitles in one pass.