

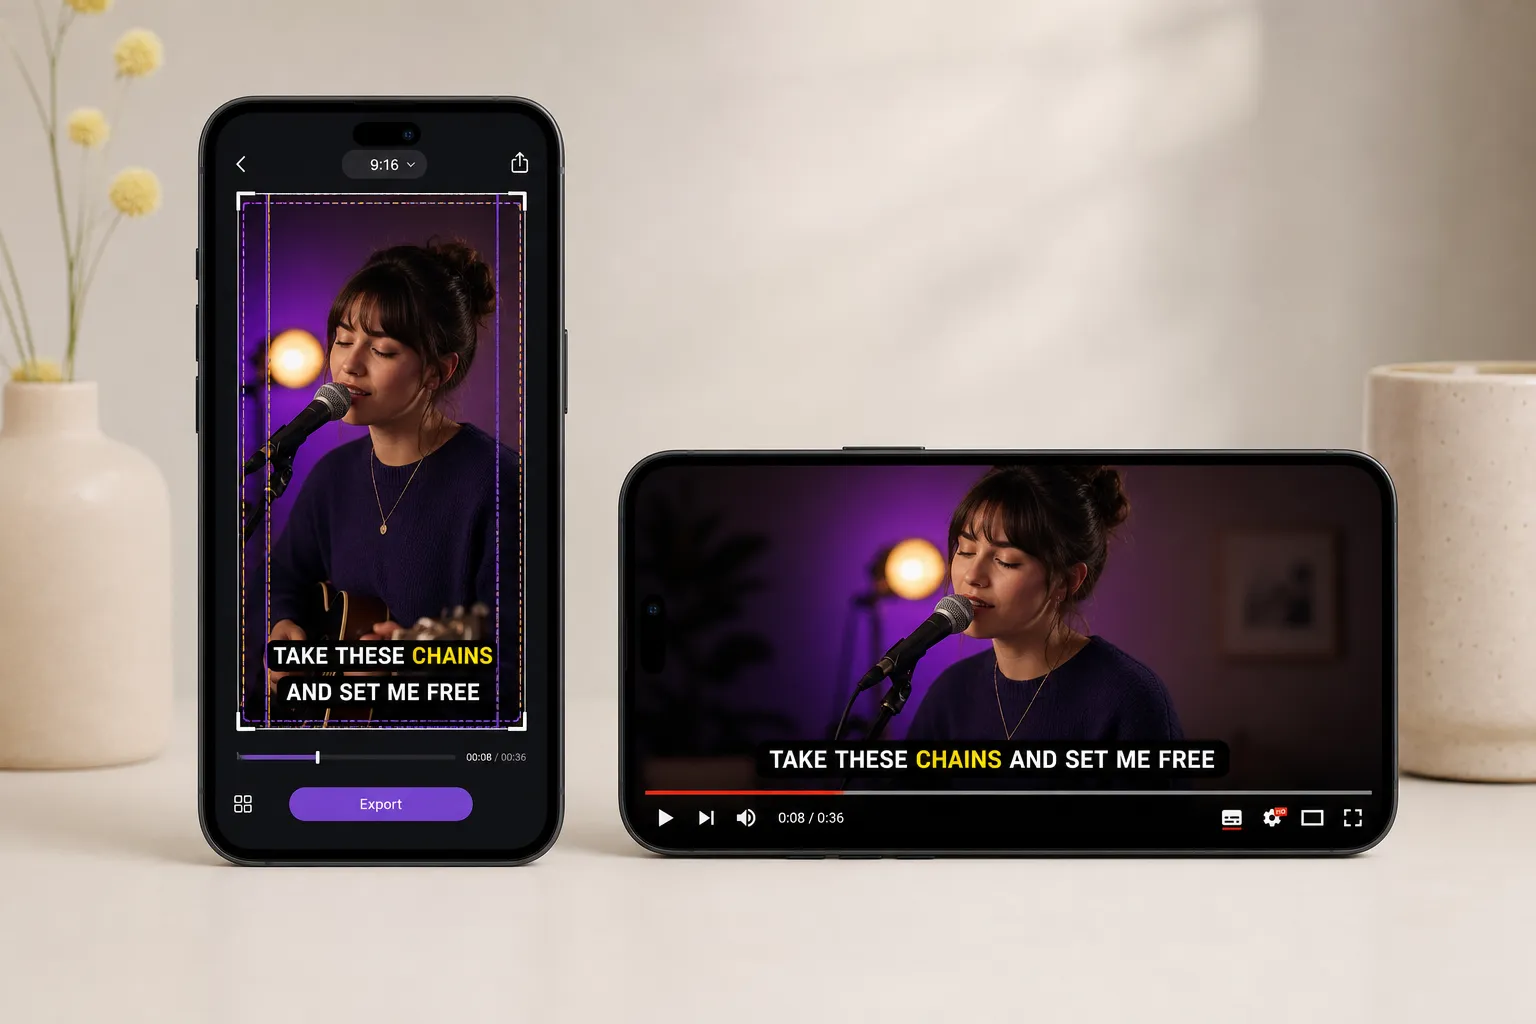
Your captions look sharp in the editor, then go mushy, get cropped, or sit under buttons once you post. That is not a writing problem. It is a social export problem. The fix is a tight set of export presets that lock in size, style, and canvas so your text stays readable on every feed.
This guide shows how to plan captions per platform, test them fast, and export with confidence. We will use built-in tools in SubtitlesFast to pair caption styling with aspect ratio changes and burned-in exports that hold up under compression.
Why presets matter for captions
Captions carry the message when sound is off and keep viewers watching. Social apps resize, crop, and recompress your upload. Small type smears, thin strokes break apart, and anything near an edge risks hiding under UI. A preset removes guesswork: pick the right aspect ratio, a font size that survives a phone screen, safe margins clear of UI, and a high-contrast style that reads on busy footage. Then repeat the same export every time.
In SubtitlesFast you can build this stack with tools you already use. Start with Change Aspect Ratio to match TikTok, Reels, Shorts, or YouTube. Set your look with Subtitle Style Customization using animated styles, fonts, colors, outlines, and background boxes. Use Karaoke Style Subtitles with word-level highlighting from AI Subtitles when pacing matters. Finish with Burned-In Subtitles so captions render exactly as designed on every platform.
TikTok and Reels recommended settings
Aspect ratio and canvas
- Use 9:16 vertical. Export at 1080 × 1920. Keep the frame rate at 30 or 60 fps to match your source.
- Keep faces and key action in the vertical middle third. Place captions over neutral areas of the frame, not over mouths or hands.
Safe zones that dodge UI
- Bottom UI: Reserve the lower 14 - 18 percent of frame height. On 1080 × 1920, that is roughly the lowest 270 - 345 px.
- Right side UI: Likes and comments float on the right. Leave 10 - 15 percent of frame width clear. On 1080 width, that is 110 - 160 px.
- Left side: Mirror right-side padding to dodge profile prompts and stickers.
- Top: Leave 8 - 10 percent of frame height to clear names and song info.
Font size and styling for clarity
- Size: Aim for text height around 6 - 8 percent of video height in 9:16. On 1080 × 1920, that is about 115 - 155 px cap height.
- Lines: Cap at 2 lines. Target 24 - 32 characters per line. Break on natural phrases for rhythm.
- Weight and family: Use a clean sans serif in regular to semi-bold weights. Avoid hairline fonts.
- Line spacing and tracking: 120 - 140 percent line height. Keep letter spacing neutral to +2 percent.
- Contrast: Use a solid fill with a thin outline, or add a semi-opaque background box. A 2 - 4 px outline and a 6 - 10 px box padding read well at 1080 × 1920.
- Color: Keep body text white or near-white. Use one accent color for keywords and the karaoke highlight.
Motion, karaoke, and readability
- Karaoke pacing: With SubtitlesFast, enable Karaoke Style Subtitles. Match highlight speed to spoken words, not frames. If speech is fast, group short words to avoid flicker.
- Animations: Keep in and out animations subtle. 150 - 250 ms wipes, fades, or highlight reveals hold up better than bounces once compressed.
- Reading speed: Keep 150 - 180 words per minute in mind. If a line feels rushed, split it earlier.
Export choices that travel well
- Burn subtitles into video to lock style and placement. SubtitlesFast exports Burned-In Subtitles that survive re-uploads and cross-posting.
- Codec and bitrate: H.264 High profile, 8 - 12 Mbps for 1080p at 30 fps, 12 - 20 Mbps for 60 fps. Audio AAC, 48 kHz, 192 - 320 kbps.
- Color: Export in Rec.709/sRGB. Avoid HDR for short-form apps that tone-map aggressively.
YouTube and Shorts settings
Standard YouTube (16:9)
- Use 16:9 at 1920 × 1080 for most long-form uploads. Keep 24, 30, or 60 fps consistent with your source.
- Text size around 4 - 6 percent of frame height reads on TV and desktop while staying legible on mobile.
- Safe areas: Avoid the lowest 120 - 160 px to clear the progress bar and info overlays. Add 80 - 100 px side padding so captions do not touch the bezel on TVs.
- Lines: 1 - 2 lines. Slightly longer lines are fine here, but keep them scannable.
YouTube Shorts (9:16)
- Mirror TikTok settings. 1080 × 1920, 6 - 8 percent text height, and a two-line cap.
- Shorts overlays shift by device. Center captions and keep equal left and right padding. Avoid the top 200 - 240 px and bottom 240 - 300 px.
Captions choice: platform vs burned-in
- Platform auto captions on TikTok and YouTube are quick, but you give up control over font, color, outline, and animations.
- If brand consistency matters, burn subtitles into video in your editor. SubtitlesFast keeps your exact design with Burned-In Subtitles.
Reach more viewers with translation
- Shorts and Reels travel globally. Use Translate Subtitles to create localized variants.
- Keep safe zones consistent across languages. Test longer words and diacritics. If your font lacks glyphs, switch to one with full Latin support.
Testing and troubleshooting before you post
Preview at real sizes
- Always preview at 100 percent zoom on a phone. Desktop previews hide compression issues.
- Spot check the first 10 seconds, a dense mid-sentence, and the last line. That is where artifacts show up most.
- Post a private or draft upload to see real UI overlays on iOS and Android before you go live.
Fix common caption issues
- Soft or fuzzy text: Increase font size slightly, bump weight one step, add a 2 - 3 px outline, or use a semi-opaque box at 60 - 80 percent to boost edge contrast.
- Cropped lines: Raise the caption block by 80 - 140 px and expand side padding. Reflow to two lines if needed.
- Hard to read on busy footage: Add a background box or dim the underlying clip by 5 - 15 percent during captioned beats using your Timeline Editing cuts.
- Too much motion: Switch to a calmer animation in Subtitle Style Customization. Aim for sub-250 ms transitions with no rapid flicker.
- Color fringing: Avoid thin yellow or red text on dark footage. Stick to white text with outline or a box.
Audio sync checks
- Word-level highlights should follow natural speech. With AI Subtitles, correct timing drift by trimming or nudging in the Timeline Editing view.
- If your edit is 30 fps, each frame is ~33 ms. Nudge captions in 1 - 2 frame steps to fix minor offsets cleanly.
- If you add music, keep captions above heavy on-beat elements so the highlight stays visible. SubtitlesFast lets you Add Music without leaving the editor.
Workflow tips to save time
- Start with an ai subtitles generator pass. In SubtitlesFast, AI Subtitles transcribes in 50+ languages with word-level highlighting. Fix names and jargon first. Timing tweaks are faster once text is clean.
- Pick one style system. Use Subtitle Style Customization to set font, color, outline, box, and one animation you reuse across projects. Consistency beats novelty for brand recall.
- Cut once, export many. Make a clean master cut with Timeline Editing, then use Change Aspect Ratio to produce 9:16 for TikTok and Reels, and 16:9 for YouTube. Adjust caption position for each canvas.
- Burn and go. Export Burned-In Subtitles for social. This locks your look, avoids platform glitches, and keeps your karaoke subtitles effect intact.
- Localize smartly. Duplicate the project and run Translate Subtitles for top regions. Keep style identical so your brand travels.
- Touch the audio. Use Add Music to layer a track that supports the pacing of your karaoke style captions. Subtle is better than loud.
- Polish your presence. For YouTube, use the AI Thumbnail Generator to create a cover that matches your caption colors. Matching type and palette makes the whole package feel intentional.
- Ship, then index. For the distribution checklist beyond video, a tool like RankGoat can handle the unglamorous SEO tasks so your post pages, transcripts, and embeds get found while you keep editing.
- Need to add subtitles to video online for a quick cutdown? Open the clip, run AI Subtitles, pick a style, and export. That covers most shorts in minutes.
Key takeaways
- Decide your social export presets up front: aspect ratio, font size, safe zones, line spacing, and contrast.
- For TikTok, Reels, and Shorts, stick to 9:16 at 1080 × 1920, two caption lines, and high-contrast styles with box or outline.
- On YouTube 16:9, use slightly smaller type, add side padding, and clear the lower overlays.
- Burned-in captions protect your design from platform UI shifts and compression.
- SubtitlesFast pairs styling, aspect ratio changes, translation, and exports so your captions stay sharp everywhere.
Whether you want clean brand captions or that animated karaoke vibe, you do not need to redesign for every post. Build one clear preset per platform in SubtitlesFast, test on a real phone, and burn subtitles into video when you want full control. Your text will stay sharp, readable, and on beat.
FAQ
What size should captions be for TikTok and Reels?
Aim for 6 - 8% of the video’s height in 9:16. Keep to two lines and use high contrast so text stays readable after compression.
Should I burn subtitles into video or use platform auto captions?
Burned-in subtitles keep your style, placement, and animations. Platform auto captions are fast but you lose design control.
How do I stop captions from getting covered by app UI?
Raise your captions above the bottom 250 - 300 px and leave 120 - 160 px side padding. Test on a real phone before posting.
What aspect ratios work best for each platform?
Use 9:16 for TikTok, Reels, and Shorts. Use 16:9 for standard YouTube. Reframe your captions for each canvas.
Can I do karaoke style captions with word-level highlights?
Yes. Use AI transcription with word-level timing and a karaoke highlight style, then export with burned-in subtitles.